
What Is Maintenance Troubleshooting?
Maintenance troubleshooting is the structured process of identifying, isolating and confirming the cause of an equipment fault when that cause is not immediately obvious, and then verifying that the fix has held. It matters most when the cause is not obvious, which is the point at which a technician has to reason from the symptoms toward the fault rather than simply carry out a known repair.
What sets troubleshooting apart from other maintenance work is that the scope of the job is unknown when it is assigned. A preventive maintenance task is defined in advance. A predictive task is triggered by a failure mode that has already been identified from condition data. A troubleshooting job begins without knowing what the work will be, which is why it resists planning, adversely impacts schedule compliance, and requires a repeatable method rather than a checklist.
The same discipline applied specifically to physical systems, such as pumps, gearboxes and drivetrains, is usually called mechanical troubleshooting. The fault in that case is mechanical in nature rather than electrical or control related, but the reasoning behind it is identical.
| Activity | How it differs from troubleshooting |
|---|---|
| Preventive maintenance | The work is planned and scheduled in advance. Troubleshooting begins with the work undefined. |
| Repair | Repair is the action taken once the cause is confirmed. Troubleshooting is the work of confirming it. |
| Root cause analysis | Troubleshooting confirms what failed. Root cause analysis establishes what allowed it to fail. |
The 5-Step Maintenance Troubleshooting Process
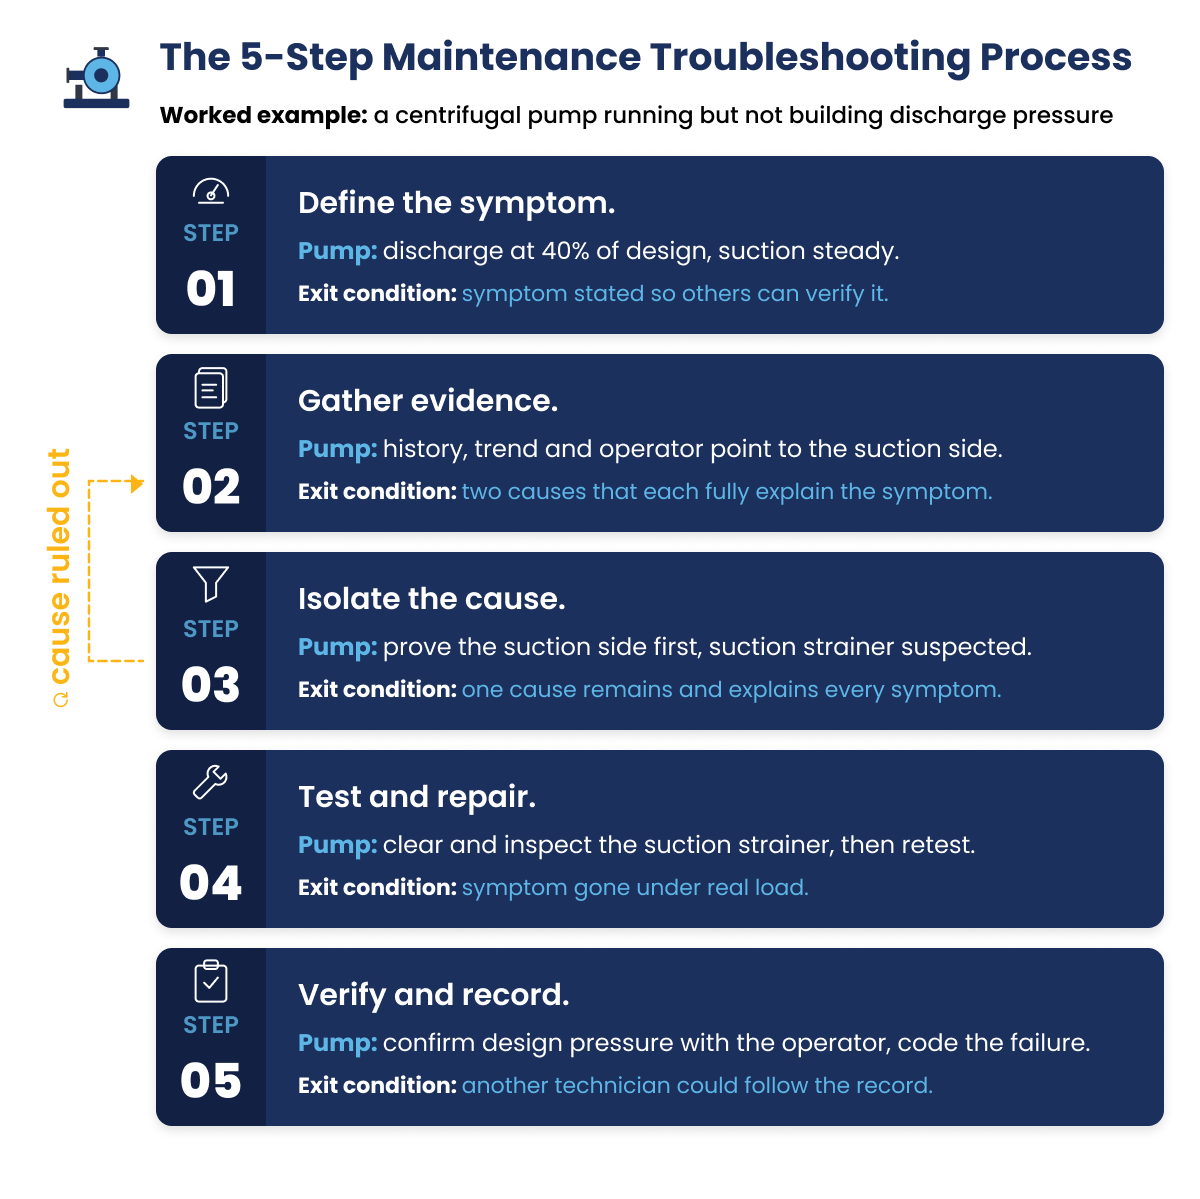
Most experienced technicians follow the same basic troubleshooting sequence, whether they name it or not. Setting it out as five clear steps gives a newer technician a way to work through an unfamiliar fault without guessing, and gives the team a shared method it can handle between shifts. The process works on any asset because it does not rely on knowing the fault in advance. Instead, it works by narrowing down what the fault could be until only one cause remains.
To keep it practical, the same fault runs through all five steps below: a centrifugal pump on a transfer duty that is running normally but not building its rated discharge pressure.
- Define the symptom, not the complaint
- Gather evidence before forming a theory
- Isolate the cause by elimination
- Test the fix, starting with the lowest-cost reversible action
- Verify under real load, then record the result
Step 1: Define the Symptom, Not the Complaint
A complaint tells you that something is wrong. A symptom tells you what is wrong, in terms another person can check. The first job in any troubleshooting exercise is to turn a complaint into a symptom.
- Establish what changed, when the asset last ran correctly, and what it was doing immediately before the fault.
- Find out whether the problem appeared during a run or after a setup change, and whether it has happened before.
- Describe the symptom in measurable terms rather than impressions: discharge pressure against design, current draw against the nameplate rating, a temperature difference, or an alarm code with its time stamp.
- Guard against reaching first for whatever fixed a similar fault last time, because the two faults may only look alike.
Example: A vague report of low output becomes a precise symptom, that is, discharge pressure sitting at 40 percent of design at full speed, with suction pressure steady.
Exit condition: the symptom is written clearly enough that another person could confirm it without you present.
Step 2: Gather Evidence Before Forming a Theory
Before settling on a theory, gather evidence from the four sources that between them explain most faults.
- The asset’s own history and past work records show what has failed on this machine before.
- The manufacturer’s manuals, piping and instrumentation diagrams, and wiring schematics show how it was built.
- Live instrument readings and historian trends show what it is doing right now.
- The operator explains what changed during the run.
When the history and the manual disagree, trust the history, because the manual describes the asset as it was designed while the history describes it as it has actually been modified over the years. This is also the stage most likely to expand without end, so set a limit: if you cannot name a likely cause within it, escalate rather than keep reading.
Example: On the pump, the history shows a suction strainer that tends to block on this service, the trend shows suction pressure slowly falling, and the operator mentions a recent change of product.
Exit condition: you can name at least two possible causes that would each fully explain the symptom.
Step 3: Isolate the Cause by Elimination
With a shortlist of possible causes in hand, the next step is to rule them out one by one until a single cause remains.
- Design each test to eliminate a cause rather than to confirm a favorite theory, because a test that can only confirm tells you nothing when it comes back negative, while a test that can eliminate moves you forward whatever the result.
- Change only one thing at a time, because making two adjustments together leaves you unable to say which one mattered and can hide a second fault.
- Work through the system in a logical order, following its natural divisions.
- Record what you rule out as well as what you find, because the list of eliminated causes is what saves the next technician time, and it is the part most often left out.
Example: On the pump, check the suction side before the discharge side, the hydraulic condition before the mechanical, and the mechanical before the electrical.
Exit condition: one cause remains and it accounts for every symptom, not only the most obvious one.
Step 4: Test the Fix, Starting With the Lowest-Cost Reversible Action
Once a likely cause is confirmed, choose the first fix to try by cost and reversibility, not by likelihood alone.
- Clean and refit before you replace, replace a wearing part before a component, and a component before a whole assembly.
- Treat spare-part availability as a real limit. When the confirmed fix needs a part that is not in the storeroom, the supervisor decides whether to run the asset in a reduced state, take it offline, or wait for the part.
- Label and keep the order of anything you remove, so that putting it back together does not create a new fault.
Example: On the pump, clear and inspect the suction strainer before pulling the pump apart to check wear-ring clearance.
Exit condition: the symptom is gone when the asset is run under the same conditions that caused it, not only under a no-load test.
Step 5: Verify Under Real Load, Then Record the Result
An asset that starts is not the same as an asset that performs, so confirm the fix at normal duty and normal load.
- Verify against real system resistance, because a pump can build pressure against a closed valve and still fall short against the resistance of the real system.
- Bring the operator into the check, since they know what normal looks like on the asset better than anyone.
- Record the symptom as measured, the causes ruled out and how, the cause confirmed, the action taken, the parts used, and any follow-up work raised if the fix was only temporary.
- Code the failure against the work order so the fault can be found again. How that code reaches the system of record is covered later on.
Example: On the pump, run it against the live system rather than a closed valve, and confirm with the operator that discharge pressure has returned to design at normal flow.
Exit condition: another technician could follow your reasoning from the written record alone.
A Troubleshooting Method Is Only As Fast As The Information Behind It.
See how AI is being applied across maintenance execution, from faster fault diagnosis to automatic failure coding, in a practical blueprint built for asset-heavy plants.
How Many Steps Does Maintenance Troubleshooting Really Take?
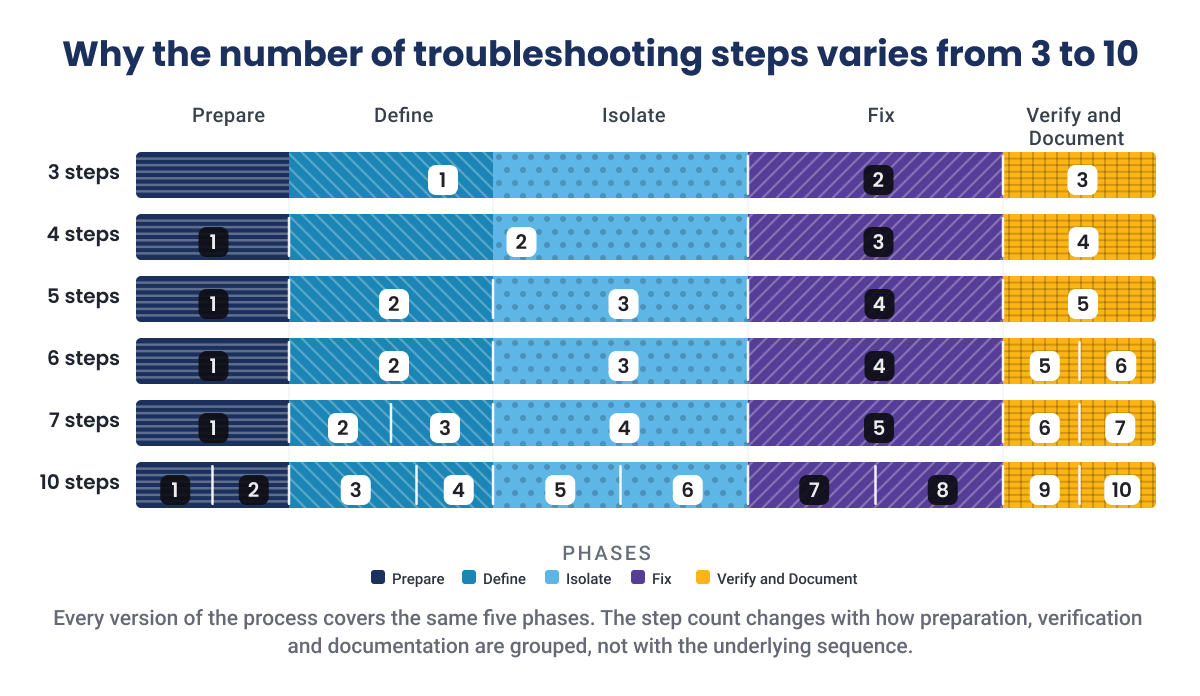
If you have looked this topic up before, you have probably seen the process described as three steps in one place and as many as ten in another. That range can make it seem as though there is no agreed method. There is. The different numbers describe the same underlying sequence divided into larger or smaller pieces, and once you can see where the divisions fall, any version reads the same as any other.
| Published step count | What that version includes | What it folds in or leaves out |
|---|---|---|
| Four steps (a CMMS vendor) | Define, isolate, fix, verify | Combines evidence gathering and isolation into a single identify step |
| Five steps (two CMMS vendors) | Symptom, evidence, isolate, repair, test | Splits verification into its own step and leaves root cause analysis outside |
| Five steps (a services provider) | Weighted toward record review and preparation before the fault is observed | Counts preparation as steps rather than prerequisites |
| Six steps (an equipment maker) | Adds a distinct confirm-the-fix-held step | Separates repair from verification |
| Seven steps (an asset platform) | Breaks evidence gathering and isolation into finer stages | Counts sub-tasks as full steps |
| Ten steps (an IT-derived method) | Adds escalation, documentation and closure as separate steps | Built for help-desk workflows, not plant assets |
The variation comes down to three editorial choices rather than any real disagreement about the work. The first is whether the preparation a technician does before seeing the fault is counted as steps or treated as groundwork. The second is whether verifying the fix and recording it are one step or two. The third is whether root cause analysis is built into the process or kept separate as a follow-up exercise. Longer versions tend to break these out, while shorter versions roll them together.
For a working technician, the number is not what matters. The order is. Any method that takes you from a clearly stated symptom to a verified and recorded fix is complete, however many steps it is broken into, and any method that leaves out verification or recording is incomplete, however many steps it claims.
7 Maintenance Troubleshooting Techniques Every Technician Should Know
A process tells you the order to work in. A technique is how you narrow the fault down within a step. The seven below are the methods experienced technicians use most, often without naming them. Each one suits a particular kind of fault, and each has a situation where it can mislead you, so the skill lies in knowing which to use and when to stop relying on it. Every technique below starts with what it is, when to use it, and finally the failure mode to watch for.
1. Half-split (binary search)
Half-split, also called binary search, means dividing a system in half, checking which half contains the fault, and repeating until the fault is traced to a single component. It is the fastest approach on any system where signals or flow pass through in sequence, such as an instrument loop, a hydraulic circuit or a conveyor line. On a long conveyor that has stopped, for example, you check the midpoint first, which tells you at once whether the fault is upstream or downstream and halves the search each time.
Failure Mode: The method assumes a straight-through system. On a branched or looped system, splitting at the wrong point sends you down the wrong path, so confirm the layout before you start halving it.
2. Known-good substitution
Known-good substitution means replacing a suspect part with one you know is working, then seeing whether the fault moves with it. Reach for it when you have a proven spare on hand and need to confirm quickly whether a particular part is the problem, for example by swapping a suspect pressure transmitter for a known-good one to see whether the reading is correct.
Failure Mode: Substitution proves where the fault is, not what caused it. If the real problem is further upstream, the fault can damage the good part you have just fitted, so check the circuit for whatever failed the original before you fit the replacement.
3. Comparison against a sister asset
Comparison means taking the same reading on an identical machine running the same duty and comparing the two. It is quick and reliable on sites with redundant pumps, parallel trains or banks of identical drives, where a healthy twin gives an instant reference for what normal should look like. If one of two identical feed pumps is drawing higher current, for example, the second pump shows at a glance whether that current is abnormal.
Failure Mode: The method assumes the sister asset is healthy. If both machines are wearing the same way, comparing them will make both look normal, so use a reading you trust as the reference wherever you can.
4. Signal tracing
Signal tracing means following a signal from its input through to its output and finding the point where it stops being correct. It is the standard approach on instrument loops and control circuits, where a signal may weaken, distort or disappear somewhere along a known path. Tracing a 4 to 20 milliamp loop from the transmitter to the control system, for example, shows exactly where the reading is lost.
Failure Mode: A reading at a test point is only as good as the reference behind it. Trusting a signal without confirming what the instrument is measuring against can send you looking in the wrong place.
5. Sensory inspection
Sensory inspection means the deliberate, structured use of sight, touch, sound and smell to gather evidence that instruments can miss. Done on purpose at the start of a job rather than by chance halfway through, it is often the fastest first read on a fault. Heat can point to friction, electrical resistance or restricted flow. An unusual smell can point to overheating insulation or a seizing bearing. Sound can point to cavitation, gear wear or a loose mounting. Vibration can point to misalignment, imbalance or looseness. Feeling for heat near a motor bearing housing at the start of a job, for example, can flag an overheating bearing before any meter comes out.
Failure Mode: The senses tell you that something is wrong but rarely prove what, so treat sensory findings as leads to confirm with a measurement, not as conclusions.
6. Instrument-led diagnosis
Instrument-led diagnosis means knowing when to stop looking and start measuring. Once a fault survives a visual check, a reading settles questions that inspection cannot, and a reading that contradicts your theory is more useful than one that confirms it, because it forces you to rethink. A vibration reading on a rotating machine, for example, can tell misalignment from imbalance in a way the eye cannot.
Failure Mode: An instrument you have not checked against a known reference can read wrong and carry the whole diagnosis with it, so confirm the meter before you trust the measurement.
7. Sequence observation
Sequence observation means watching a machine run through its cycle and noting the exact step at which it fails. It narrows a control fault faster than any meter, because a machine that completes the first three steps of a cycle and stops on the fourth has already told you where to look. On high-speed equipment where the eye cannot keep up, a slow-motion phone video does the same job. Filming a packaging machine at slow speed, for example, can reveal a cap being placed a fraction late, which no live observation would catch.
Failure Mode: You can only spot the abnormal step if you know the correct sequence first, so learn how the machine should run before trying to catch where it goes wrong.
| Technique | Best-fit fault type |
|---|---|
| Half-split | Serial systems: loops, circuits, conveyor lines |
| Known-good substitution | Locating a fault fast when a proven spare is on hand |
| Sister-asset comparison | Redundant or parallel equipment |
| Signal tracing | Instrument loops and control circuits |
| Sensory inspection | Early-job triage on rotating equipment |
| Instrument-led diagnosis | Confirming or ruling out a theory with a reading |
| Sequence observation | Control and cycle faults on automated lines |
How Mechanical, Electrical and Operational Faults Show Themselves
A technician almost always starts from a symptom and works back toward a cause, so it helps to know what a given symptom is likely to be telling you. The most important thing to understand before you begin is that a symptom does not belong to a single domain. The same observation can have a mechanical, an electrical or an operational cause, and often has causes in more than one at the same time. A nuisance trip can look purely electrical and turn out to be mechanical. A vibration can look purely mechanical and turn out to be an operational problem with what the machine is being fed. Keeping that in mind stops you committing to one domain too early.
| Observable symptom | Likely mechanical cause | Likely electrical cause | Likely operational cause |
|---|---|---|---|
| Abnormal vibration | Misalignment, bearing wear, imbalance, looseness | Electrical imbalance in the motor windings | Cavitation from a starved suction, off-design flow |
| Rising bearing temperature | Over- or under-greased bearing, misalignment | High motor current | Overloading beyond rated duty |
| Fluid leak | Failed seal or gasket, cracked casing | Rarely electrical | Overpressure or thermal expansion upstream |
| Pressure loss | Worn wear rings, damaged impeller, blocked strainer | Motor running slow or reversed | Partially closed valve, wrong setpoint |
| Intermittent stop | Loose coupling, binding drive | Loose or corroded connection | Interlock tripping on a process condition |
| Nuisance trip | Binding drivetrain raising the load | Undersized overload, loose connection | Feed surge, wrong material |
| Slow cycle | Worn actuator, hydraulic leak | Failing sensor, weak signal | Wrong recipe, changed product spec |
| Inconsistent product quality | Worn tooling, mechanical drift | Sensor drift | Raw material variation, operator setup |
1. Mechanical Faults: What Vibration, Heat and Leaks Are Telling You
Mechanical faults usually show up first as vibration, heat or a leak, and each points in a fairly consistent direction. On rotating equipment, abnormal vibration almost always comes down to one of four causes: misalignment, bearing wear, imbalance or looseness. The vibration signature is what separates them, since misalignment tends to show at twice the running speed, imbalance at the running speed, bearing wear as high-frequency energy, and looseness as a broad and unstable pattern. Heat is usually a secondary sign rather than a fault in its own right, so a hot bearing is best read as a pointer to friction, poor lubrication or excess load rather than as the problem itself. A leak works the same way, since it is often the result of an overpressure or thermal condition further upstream rather than a failure at the point where the fluid escapes.
2. Electrical Faults: Check the Supply Before You Suspect the Component
Electrical faults are best approached from the supply inward, because the most common causes sit early in that chain. Work through the supply in order before suspecting any component: the breaker, the disconnect, the fuses, the control voltage and the interlocks. This sequence is easy to skip under time pressure, and skipping it is how a healthy contactor gets replaced to fix what was only a tripped breaker. On a plant that vibrates, the single most frequent electrical fault is not a failed component at all but a loose or corroded connection, which shows up as an intermittent fault precisely because vibration keeps making and breaking the contact. It is also worth being clear about where in-house diagnosis should stop and a qualified electrical specialist should take over, because calling that specialist late usually costs more than calling early. A misdiagnosed electrical fault often damages a component on the way.
3. Operational Faults: When the Problem Is Not the Machine
Operational faults are the ones where the machine is working as designed and something around it is not. The cause might be the wrong material, an incorrect setpoint, a startup carried out in the wrong order, a change in product specification, or a modification made at some point and never written down. Older assets are especially prone to this, since they often carry years of undocumented changes, so on an older machine the quickest route is often to establish what the original standard was before diagnosing any deviation from it. The clearest sign of an operational cause is a pattern in when the fault occurs. If failures group around a particular shift, crew, product changeover or batch of raw material, the asset itself is rarely the problem. Understanding why equipment breaks down in the first place helps separate a one-off operational upset from a genuine reliability defect.
Safety First: What to Confirm Before Troubleshooting a Live Asset
Troubleshooting carries a risk that planned maintenance usually does not, because it often has to be done with the asset running or energized. A machine that has been shut down and isolated cannot show you the fault you are trying to find. That need to keep the asset live is exactly what makes troubleshooting more hazardous than routine work, and it is why a set of safety checks has to come before any diagnosis on a live asset, rather than as an afterthought once the work is underway.
- Isolate and lock out wherever the diagnosis does not need the asset live. OSHA’s control of hazardous energy standard requires energy to be controlled during servicing unless a narrow set of exceptions applies.
- Where the asset genuinely has to stay live, a qualified person must verify the presence or absence of voltage with test equipment before anyone is exposed. The OSHA standard on electrical work practices requires exactly this, including a check for induced voltage and backfeed from other sources.
- Raise an electronic permit to work so the specific hazards of the job are captured and controlled.
- Match personal protective equipment to the energy actually present, not to the task as it was originally scoped on the work order.
- Put a second person in place for any work above your site’s defined energy threshold.
The state the asset is left in also decides which of the techniques described earlier are available. A pump that is locked out can be inspected, turned by hand and measured cold, but it cannot be signal traced under load. An energized loop can be signal traced, but only by a qualified person once voltage has been verified. In other words, the safety decision shapes the diagnosis itself rather than sitting alongside it as paperwork, and the record it produces is a regulatory requirement rather than a matter of good practice.
Troubleshooting vs. Root Cause Analysis: Knowing Which One You Need
Troubleshooting and root cause analysis are often treated as the same activity, and confusing them is a common reason both end up done poorly. The difference is straightforward. Troubleshooting confirms what failed and proves it, so the asset can be returned to service. Root cause analysis goes a step further and asks what allowed the failure to happen in the first place, so that it does not happen again.
The two also happen at different times and under different pressures. Troubleshooting takes place while production is waiting, where the priority is a safe and quick restart. Root cause analysis takes place afterward, using the evidence that troubleshooting produced, with the time to examine it properly. Trying to carry out a full root cause analysis while the line is still down tends to rush the analysis and delay the restart, so both suffer.
| Troubleshooting | Root cause analysis | |
|---|---|---|
| Purpose | Confirm what failed | Explain what allowed it to fail |
| When it happens | During the event, with production waiting | After the event, once the evidence is in hand |
| Output | A verified fix and a coded failure | A corrective action that prevents recurrence |
| Who runs it | Technician and supervisor | Reliability engineer, planner, cross-functional team |
Not every fault warrants a root cause analysis, and knowing when to run one saves a great deal of effort. It is worth doing when the same failure keeps recurring, when the failure had a safety or environmental impact, when the repair cost was significant, or when the failure was unexpected for that type of asset. For routine faults that fall outside those cases, the right move is to close the job, code the failure and move on.
When a root cause analysis is warranted, the common methods are the 5 Whys, fishbone analysis, FMEA and Pareto analysis. Taking the pump example one step further shows the difference in practice: troubleshooting proved that the wear rings were worn beyond their clearance, while root cause analysis asks why that clearance was never picked up during a preventive maintenance check.
Most Troubleshooting Evidence Never Survives The Shift That Produced It.
See how plant teams capture diagnosis, parts and verification against the work order in SAP, on the device, in the field, with Innovapptive’s connected worker platform.
Why Troubleshooting Stalls When the Work Order Is in SAP but the Knowledge Is Out of Reach
In most large plants, the thing that slows troubleshooting down is not a lack of skill. It is a lack of information at the point where it is needed. The evidence a technician needs early in a job tends to live in four separate places, and three of them are usually not on the device the technician is holding at the asset.
- The maintenance notification records the reported symptom but seldom the diagnosis, so the single most useful piece of information for the next technician is the one least likely to be there.
- Failure and cause codes exist in the catalog, but under time pressure they are often skipped or left at a default, so the history that later diagnoses depend on never builds up.
- Asset history can be pulled from the system of record at a desk, but not from the field, so the technician standing at the pump cannot see what that pump did last quarter.
- Manuals, schematics and previous work instructions sit in a document store that no one opens on a phone.
- The one technician who has seen this exact fault before is working a different shift.
Two costs follow from this, and both are measurable:
- Labor cost: Every trip back to a terminal to look something up is time the technician is not on the tools, which is why wrench time, the share of a shift actually spent working on the asset, sits in the high twenties to low thirties as a percentage on a typical site, against a world-class level that is roughly double that.
- Lost production: On a production-critical asset, every hour spent diagnosing is an hour the asset is not running, and on a process plant that is usually the larger cost of the two.
Both show up in mean time to repair, or MTTR, with first-time fix rate as the early warning sign, and both are the reason any serious effort to reduce maintenance costs has to start by getting the right information to the technician at the asset.
Failure codes deserve particular attention, because they are what turn one technician’s diagnosis into the evidence the next technician starts from. They are skipped most often on exactly the jobs where they would help most, since the coding screen tends to appear at the end of a long unplanned job when everyone wants to finish. A useful code set records the affected part, the type of damage and the cause, rather than a free-text note that cannot be searched. Every time coding is left at a default, the next diagnosis on that asset begins from nothing.
The answer is not more training or a more experienced technician. It is closing the loop where the work is done, so that the diagnosis, the failure code, the parts used and the verification are all captured on the device against the work order and flow into the system of record without a second round of data entry. Getting those four sources of evidence, along with previous fixes, onto the technician’s device through digital work instructions is what turns the method into something that works in practice, on a night shift, with the line down.
SAP and IBM Maximo Hold The Record. Something Has To Carry It To The Technician.
See how a frontline execution platform closes the gap between SAP and the field, with real examples of industrial AI at work on the plant floor.
Maintenance Troubleshooting Best Practices That Actually Reduce MTTR
A method only helps if it becomes standard practice across the team. The eight habits below are the ones that consistently bring diagnosis time down, and each has a specific, measurable effect.
- Write down what you eliminated, not just what you found: The list of eliminated causes is the asset’s real diagnostic history, and it stops the next technician repeating tests you have already done. It is the single fastest way to shorten the next job on the same machine.
- Change one variable at a time: Making two adjustments at once leaves you unable to tell which one worked and can hide a second fault that appears later. One change per test keeps every result meaningful.
- Try the lowest-cost, reversible fix first: Clean and refit a part before replacing it, and replace a wearing part before a whole component. Working in this order keeps a wrong guess cheap and leaves the asset easy to return to its previous state if the guess was wrong.
- Learn the asset while it is running correctly: You cannot recognize an abnormal reading or sound without knowing the normal one. Time spent watching a healthy pump, listening to a sound gearbox and noting normal readings is what lets a technician spot a deviation quickly later on.
- Ask the operator specific questions rather than open ones: Replace “what happened?” with questions such as whether the asset was running normally before it stopped, whether the fault began after a setup change, and whether it has happened before. Specific questions turn a vague report into usable evidence.
- Code the failure before closing the job: The code is what makes the fault searchable next time. Recorded at closure, it takes a minute, but skipped it can cost the next diagnosis an hour.
- Set a time limit for escalation: Agree in advance how long a technician works a fault alone before calling for help, so that no one spends most of a shift on a problem no one else is aware of.
- Hold a short handover on any job that ran longer than expected: Cover what worked and, just as importantly, what did not, since the failed attempts are what save the next person the same dead ends. A structured shift handover software keeps that knowledge with the asset rather than with the individual.
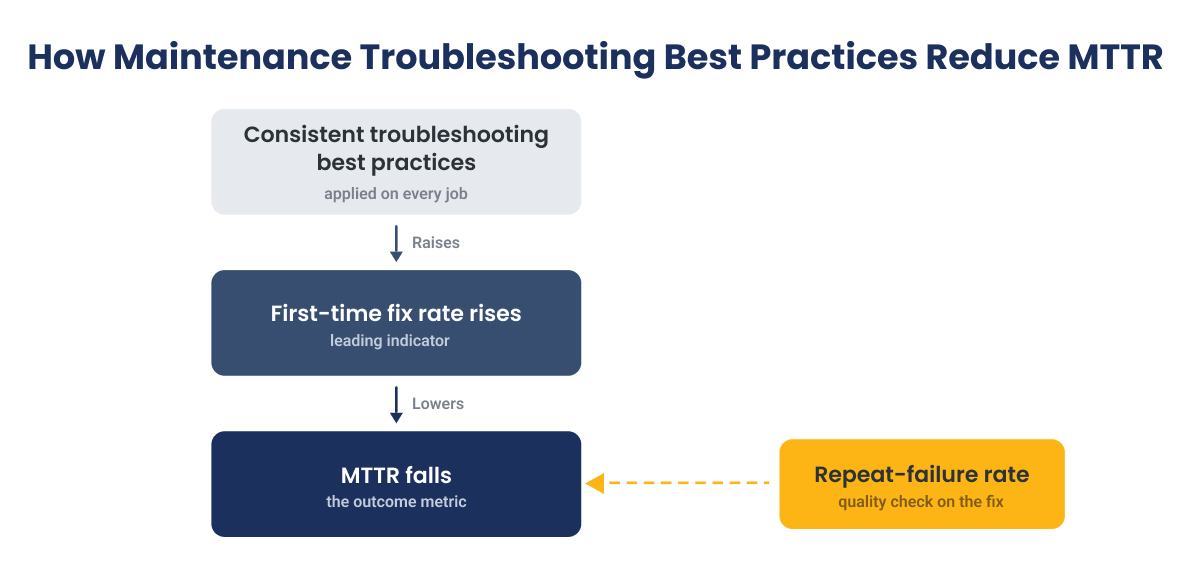
Three measures show whether any of this is working. MTTR, the average time from failure to the asset being back in service, is the outcome you are trying to move. First-time fix rate, the share of jobs resolved on the first visit, is the early indicator that diagnoses are sound. Repeat-failure rate on the same asset is the quality check, since a fault that returns means the troubleshooting found a symptom rather than the cause. Tracked together, these three turn the habits above from good advice into something you can see and manage.
How Innovapptive Helps Plant Maintenance Teams Troubleshoot Faster
The problem described above is one of getting the right information to the technician at the point of work, and that is where Innovapptive fits. Innovapptive is an industrial execution platform and connected worker platform that runs on top of SAP, IBM Maximo or Oracle EAM and writes back to it. It does not replace the system of record. It puts the system of record in the technician’s hand at the asset. Its mobile maintenance software is built for the technician carrying out the work in the field, and four of its capabilities map directly onto the troubleshooting method described in this article.
- Asset 360 brings equipment-level dashboards to the asset itself, reachable by scanning a QR code, showing runtime, downtime, maintenance frequency and failure trend. This is the evidence a technician needs early in a job, available at the pump rather than back at a desk.
- WorkSmartAI™ turns a photo or a short written prompt into a structured issue or work order in seconds and identifies the equipment or functional location automatically. This captures the symptom cleanly at the very start of the job, without the technician having to search through master data.
- Contextual in-app chat on each work order, together with the SIA assistant and its record of previous conversations for that work order,providing technicians the full context prior to reaching the asset. This helps close the knowledge gap in real time.
- RapidSync™ keeps all of this working offline, with two-way SAP synchronization in under five minutes, which is what allows it to function in the low-connectivity and intrinsically safe areas where much troubleshooting actually takes place.
Proven Results: How One Indorama Ventures Site Cut Its Backlog by 58%
Indorama Ventures, a global chemical manufacturer, was running one of its sites on a reactive, break-fix footing. Technicians were diagnosing faults with little asset history to hand, the maintenance backlog had built up to 24 weeks, and the site leaned heavily on contractors to keep pace. After deploying Innovapptive’s connected worker platform on top of its existing SAP and IBM Maximo systems, the site moved diagnosis, failure coding and execution onto mobile devices at the asset. Within twelve months, that single site had contributed $19M in realized annual maintenance savings and EBITDA impact, alongside a set of audited operational gains:
| Metric | Before | After |
|---|---|---|
| Maintenance backlog | 24 weeks | 10 weeks (58% reduction) |
| PM-to-CM ratio | 45% | 80% |
| Parts availability | 55% | 95% |
| Contractor headcount | 140 | 87 (38% reduction) |
Each of those numbers traces back to the same shift this article describes: giving technicians the history, the parts information and the failure codes they need at the asset rather than at a desk. These are published, audited results from a single-site deployment. Read the full Indorama Ventures case study for the operational detail behind them.
See What Your Technicians Could Diagnose if Asset History, Prior Fixes and Failure Codes Reached Them At The Asset Instead Of At A Desk.
Get a working walkthrough of Innovapptive’s mobile maintenance execution on a live plant scenario, mapped to your assets, your failure codes and your existing SAP or IBM Maximo setup.

Unlock Margins Hidden in your Maintenance
Watch how leading manufacturers improve OEE, increase PM compliance, and reduce downtime through connected execution.

- 05-10-2026
10 Best Shift Handover Software Platforms for Plant and Process Operations
Shift handover software can mean different things depending on the operating environment. Some...

- 29-09-2026
Best SAP Maintenance Planning & Scheduling Software 2026
Your maintenance work orders live in SAP Plant Maintenance (PM), while the working schedule lives...

- 28-09-2026
Best Work Order Software: Top 9 Platforms Compared
Selecting the best work order software is a different decision for a large industrial plant than...